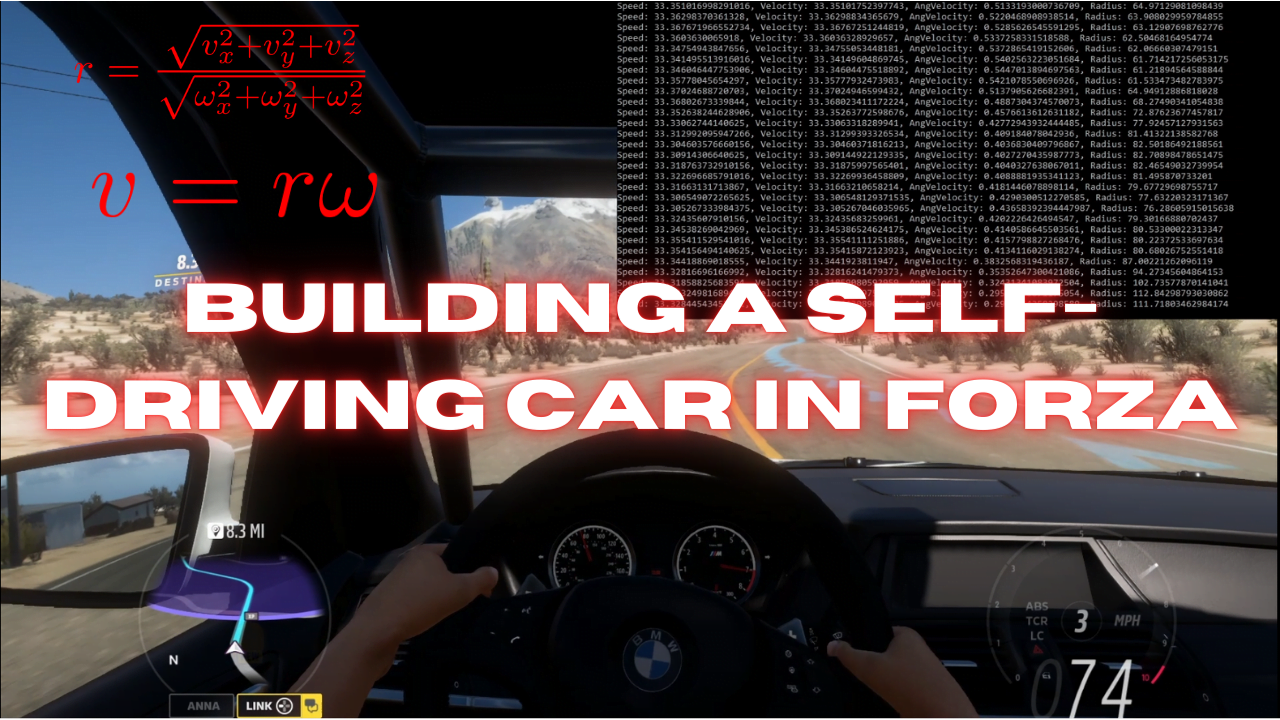
With the proliferation of photorealistic car simulations such as CARLA, AutoDrive, and the NVIDIA DRIVE Sim, it’s become easier than ever to try out and develop autonomous driving algorithms in an ideal environment with massive amounts of data available. In this post, I’ll be trying something different, using the Forza Horizon 5 video game as a simulation environment for a self-driving car.
The Forza series of games is known for their realism, both in simulating the physics of a car’s motion (e.g. tire slip, weight distribution, and suspension travel) and in the lifelike view of the road which is visible to players. Most racing video games are quite simple: There are two inputs, steering and throttle (three, if you count braking separately), and you control the car by looking at the road and judging what to do. Now, most approaches to building self-driving cars have focused on using distance measurements to obstacles using LiDAR, or extracting information front-facing cameras to precisely track the path of the road. Unlike simulators built for this purpose, Forza doesn’t provide this data to end users.
The neat part about newer Forza games (Horizon 5 and Motorsport), though, is that they do come with some limited amount of telemetry. You can enable data streaming over a UDP socket which will stream some interesting info at an IP address of your choice. This telemetry data was intended for creating hyper-realistic sim racing setups, complete with shaking and bouncing interiors, but there are lots of useful things we can gain from it:
- The car’s acceleration, velocity, and angular velocity in X, Y, and Z
- The car’s current yaw, pitch and roll
- The steering, throttle and brake values being input by the user
At the bottom of the list, though (see above link), is a cryptic, yet extremely useful piece of information: NormalizedDrivingLine. The official documentation has no information on what this number may represent, but the community of Forza enthusiasts figured it out:
I did some empirical testing on normalized_driving_line and found that +127 seemed to correlate well with the left edge of the track and -127 correlated well with the right edge of the track. I did not find a correlation with the blue/yellow/red driving line.
https://github.com/MatthewCash/libforza/issues/1#issuecomment-1026512865
Combined with the fact that the car’s speed can be readily accessed, I figured creating a simple approximation of self-driving would be achievable inside the game. This is how I did it.
Setup
First, I adopted the code from the forza_motorsport library on GitHub to parse the data streamed by Forza. The library has tools to record any data recieved to a TSV file, and my fork adds a simple addition to stream the values as a Python generator. To enable telemetry yourself, you can Google “enable forza telemetry UDP”. You will need to stream the data to 127.0.0.1 (your own computer) and ensure you know the port it is being streamed to.
Now that I had reliable data available, I could turn to intelligently controlling the car.
Controlling Throttle
The problem of driving a car can crudely be split into two distinct sub-problems: controlling speed with the gas pedal, and controlling position on the road by steering. Of course, autonomous throttle is available in every modern car in the form of cruise control.
To formulate cruise control, we first need to know what our inputs and outputs are:
| Inputs | Outputs |
|---|---|
| Speed of the car (meters per second) | Throttle (0 to 1, where 0 is no throttle and 1 is full throttle) |
| Desired speed of the car (miles per hour 🇺🇸) |
To express the problem in words, we want to increase the throttle until we reach our desired speed, decrease the throttle if we’re going too fast, and in general keep the speed of the car at precisely the desired set point regardless of where the car is (up a hill, a slanted surface, etc.) The most basic way to do this is known as a “Bang-Bang” controller: if the car is going too slow, apply full throttle. If it’s too fast, apply no throttle. Naturally, this sort of controller is far too simple to actually be useful. For one, it doesn’t take into account how far off the car is from its desired speed. Furthermore, it doesn’t take advantage of the analog nature of a gas pedal, instead only returning two possible states.
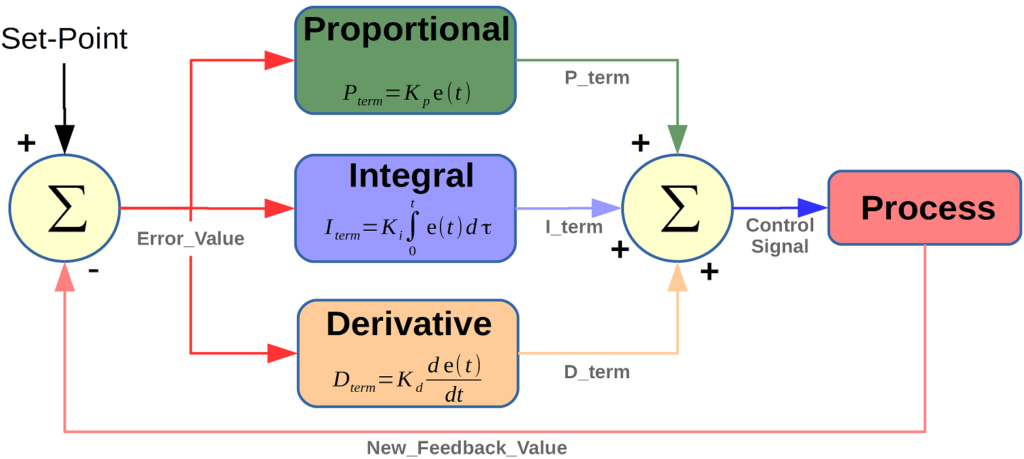
PID controllers are a more sophisticated control scheme, much more useful for controlling our virtual racecar’s throttle. To recap what a PID controller does:
- The Proportional term adjusts the output proportionally to the error between the current signal and the desired setpoint. In our case, it would increase the throttle proportionally to how far off the desired speed we currently are.
- The Integral term adjusts the output according to the error accumulated over time. In general, this helps to nudge a system to its setpoint if it is close, but not quite there.
- The Derivative term adjusts the output based on the rate of change of the error. So, if the gap between my current speed and desired speed is growing faster, the D term will account for this trend. If you think of it as a linear approximation, it’s essentially “looking into the future” at what the error signal is going to be.
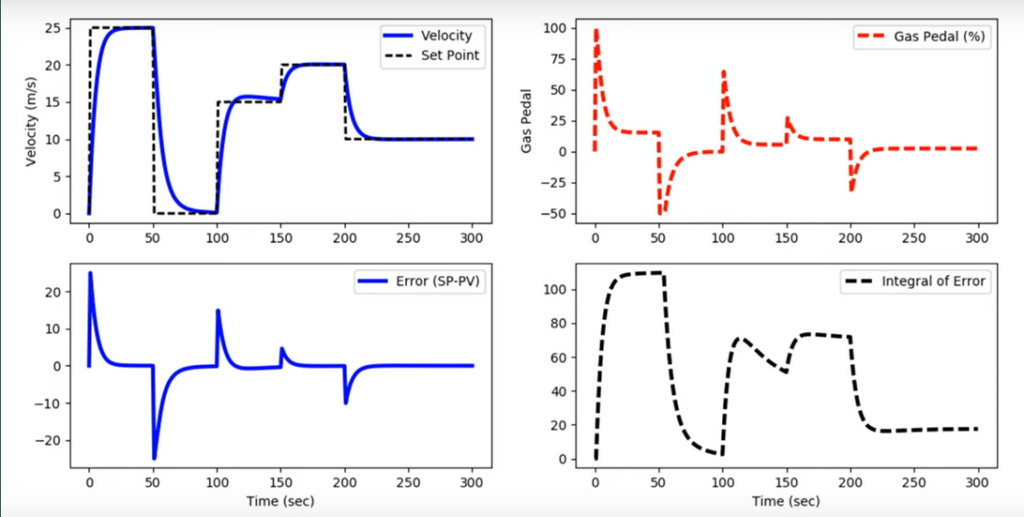
At every timestep, the PID controller computes the error. Then it computes the P, I, and D terms, adds them up, and that’s the output. In reality, it looks something like this:
Implementing throttle control with Python
Now that we have the fundamental concept, we can implement this with the telemetry data from the forza_motorsport library.
class pid_throttle():
    def __init__(self):
        self.SPEED = 20 # m/s
        self.pid = PID(1, 1, 1, setpoint=self.SPEED)
        self.pid.output_limits = (0, 1)
        self.speed_generator = return_vals(PORT_NUMBER)

    def get_speed(self):
        speed = next(self.speed_generator)[0]
        out = self.pid(speed)
        return out
Some notes:
return_valsis implemented in the forza_motorsport library here: https://github.com/mgagvani/forza_motorsport/blob/0ebc31d813918164bda9a67f930ad98997c23ebb/data2file.py#L52- The PID object is imported from the simple-pid Python library: https://pypi.org/project/simple-pid/0.2.1/ . While PID is pretty easy to implement yourself, the library does a lot of helpful things for you such as keeping track of timesteps in between calls.
- PORT_NUMBER is specified in the Forza settings menu. You also need to set this in the configuration file, an example of which can be found here: https://github.com/mgagvani/forza_motorsport/blob/master/example_configuration.yaml.
speedwould need to be the first value inparameter_listaccording to the above code snippet. - The PID gains aren’t tuned here: each of them is 1. This seems to work essentially all the time but there is definitely room to refine them.
- This code doesn’t actually control the car inside of Forza. I will get to that in a later section.
Controlling Steering
Now we get to the real substance of the self-driving problem: staying between the lines of the road. To control throttle, we used the speed telemetry. Now, to control steering, we will use the norm_driving_line variable which outputs a value from -127 to 127 depending on if you are on the right or left edge of the road. Thus, our PID controller will be set to a desired state of 0, and we will change the steering in order to minimize the error between our current driving line and the center of the road.
The most difficult part of this was tuning the PID gains. If the P value is too high, the car will oscillate around the road, tracing out increasingly large squiggles. If the D value is too low, the car won’t react to curves in the road, which can be seen when the error function starts to rapidly increase. Finally, the I value needs to be just enough to keep the car in the middle of the road while not overreacting to temporary deviations from the center on tight turns.
Here is the code updated for controlling steering and throttle with PID control:
class pid_steer_throttle():
    MPH_TO_MPS = 0.44704

    def __init__(self):
        self.SPEED = 40 * self.MPH_TO_MPS # m/s
        self.throttle_pid = PID(1, 1, 1, setpoint=self.SPEED)
        self.throttle_pid.output_limits = (0, 1)
        self.speed = 0

        self.SETPOINT = 0 # center of the road
        self.S_KP = 4.0 / 127.0
        self.S_KI = 0.5 / 127.0
        self.S_KD = 8.0 / 127.0
        self.steer_pid = PID(self.S_KP, self.S_KI, self.S_KD, setpoint=self.SETPOINT)
        self.steer_pid.output_limits = (-1, 1)
        self.norm_driving_line = 0

        self.generator = return_vals(PORT_NUMBER)

        self.actor = Actor(load_model=False)

    def __update(self):
        data = next(self.generator)
        self.speed = data[1]
        self.norm_driving_line = data[0]

        steer =  - self.steer_pid(self.norm_driving_line)
        throttle = self.throttle_pid(self.speed)

        # print current steer, norm_driving_line
        print(f"Steer: {steer}, Norm Driving Line: {self.norm_driving_line}, data: {data}")

        return steer, throttle

    def __call__(self) -> Any:
        while True:
            try:
                steer, throttle = self.__update()
                self.actor.control_racing([steer, throttle])
            except KeyboardInterrupt:
                print("Stopping due to Ctrl C Event")
                break
You can see the throttle and speed component remains the same except for a small conversion from meters per second to miles per hour to make debugging easier. Each PID gain for the steering is divided by 127, since the error signal will be on a scale from (-127, 127) while we want our steering value (the output) to be on a scale from 0 to 1, thus we have to adjust proportionally.
The __call__() function is a special Python function which lets a class behave like a function. It wraps up __update() in a loop and then controls the virtual Forza car. You can find the implementation for the Actor class here, in my Xbox Game AI project. The program relies PYXInput, a virtual controller library which emulates Xbox controllers on Windows, to send steering and throttle values to Forza.
High-Speed Racing
The above code works extremely well for driving at low speeds. I can use it to drive mostly any car in Forza Horizon 5 at a sedate 40 miles an hour. However, in making a few assumptions, it fails to capture some of the simple details of driving a car, for example, slowing down when you turn.
Since the steering and throttle PID loops are entirely independent, each is trying to maintain their setpoint regardless of what the other is doing – clearly not what happens in real life. Thus, it’s time to move onto a more complex model of our video game racecar.
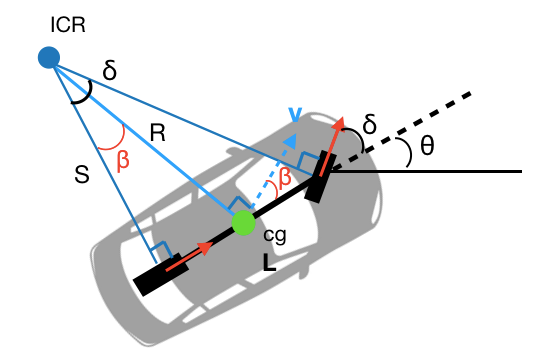
PID controllers are amazing because they let us treat systems like black boxes: we don’t need to know what’s going on inside, we just need to know the error term and where to plug in our output. However, the motion of cars is extremely well-studied, and the most useful concept we can take inspiration from is the Kinematic Bicycle Model, which analyzes the motion of one set of wheels. While Forza’s internal vehicle simulation is far more complex, the bicycle model is still a very good approximation.
The key advantage of the bicycle model is that it differentiates between the car’s turning angle and the steering angle of the wheel. This is useful when dealing with real cars, or advanced simulations. However, in our video game, we don’t have direct control over the actual angle of the steering wheel, only a single, unit-less steering value. However, we can take advantage of the idea of the instantaneous center of rotation (ICR): at any given point, the car is tracing a circle, and the ICR is the center of that circle. As the radius of this circle increases, we know the car is going in a straight line, as an infinite radius means zero curvature. Thus, we can adjust our throttle based on tight of a curve our car is driving.
To formulate this, we know from physics that velocity is equal to radius times angular velocity:

Forza’s telemetry gives us both velocity and angular velocity in X, Y and Z components. Thus, we can calculate the radius of the circle we are tracing at that instance:

For reference, the turning circle of a Ford F-150 is about 7 meters. Keeping in mind that turning circles are measured at a very low speed, I found that an instantaneous radius of about 30-40 meters corresponds with a tight turn after collecting some data in Forza. The below code includes logic for tight curves:
class pid_steer_throttle():
    MPH_TO_MPS = 0.44704

    def __init__(self):
        self.SPEED = 75 * self.MPH_TO_MPS # m/s
        self.throttle_pid = PID(1, 1, 1, setpoint=self.SPEED)
        self.throttle_pid.output_limits = (0, 1)
        self.speed = 0

        self.SETPOINT = 0 # center of the road
        self.S_KP = 4.0 / 127.0
        self.S_KI = 0.5 / 127.0
        self.S_KD = 8.0 / 127.0
        self.steer_pid = PID(self.S_KP, self.S_KI, self.S_KD, setpoint=self.SETPOINT)
        self.steer_pid.output_limits = (-1, 1)
        self.norm_driving_line = 0

        self.generator = return_vals(PORT_NUMBER)

        self.v_x, self.v_y, self.v_z = 0, 0, 0 # linear velocity
        self.w_x, self.w_y, self.w_z = 0, 0, 0 # angular velocity

        # if radius of curvature is less than, we are turning hard (close to turning circle)
        # so cut the throttle
        self.RADIUS_THRESH = 35 # m

        self.actor = Actor(load_model=False)

    def __update(self):
        data = next(self.generator)
        self.speed = data[1]
        self.norm_driving_line = data[0]
        self.v_x, self.v_y, self.v_z = data[5:8]
        self.w_x, self.w_y, self.w_z = data[2:5]
        assert type(self.speed) is float and type(self.norm_driving_line) in (float, int), f"Error (Assert): {self.speed}, {self.norm_driving_line}"

        # instantaneous radius of curvature
        v = np.linalg.norm([self.v_x, self.v_y, self.v_z])
        w = np.linalg.norm([self.w_x, self.w_y, self.w_z])
        radius = v / w if w != 0 else 0

        steer =  - self.steer_pid(self.norm_driving_line)
        throttle = self.throttle_pid(self.speed) if radius > self.RADIUS_THRESH else 0
        print(f"Speed: {self.speed}, Velocity: {v}, AngVelocity: {w}, Radius: {radius}")

        return steer, throttle

    def __call__(self) -> Any:
        while True:
            try:
                steer, throttle = self.__update()
                self.actor.control_racing([steer, throttle])
            except KeyboardInterrupt:
                print("Stopping due to Ctrl C Event")
                break
Note that power is completely cut off if the car is turning in a circle tighter than 35 meters here. I found that this hard cutoff helps the car recover from sharp turns and more extreme spin-outs, which makes it possible to increase the speed target to 75 miles an hour.
Also, the generator is returning more values in this example. Rather than just norm_driving_line and speed, each component of angular velocity and velocity is being streamed. (By the way, the calculation of velocity in the code is the exact same as the speed variable we were already using. I explicitly calculated it to stay consistent with the equations). Below is the YAML configuration file I used to get the data from the forza_motorsport library:
port: 2560
output_filename: forza_data.csv
format: csv
append: False
packet_format: fh4
parameter_list:
  - norm_driving_line
  - speed

  - angular_velocity_x
  - angular_velocity_y
  - angular_velocity_z

  - velocity_x
  - velocity_y
  - velocity_z
Here is a video of the adaptive PID algorithm in action:
Thanks for reading! If you have any questions or comments, on my approach, or how to replicate my results, please feel free to comment.


